DIY scrapbooking: tips for beginners and various decoration options (105 photos). DIY album decorations How to make scrapbooking decorations
A couple of scrapbook flowersFlowers are one of the most popular decorations for any scrap item, from miniature cards to scrapbooks. Of course, in specialized stores the range of such jewelry is quite large. But, firstly, even in large stores it is not always possible to find something that really suits the style and color scheme. Secondly, it is not difficult to make flowers for scrapbooking with your own hands, they will cost less and will be absolutely unique. The material is most often paper, but sometimes they are made from fabric and even polymer clay.
Flowers from plain thick paper
To begin with, let's look at how to make paper flowers without special figured hole punches and other devices. The first option: cut out 5 blanks with seven petals from colored paper. Each next detail should be less than the previous one. The smallest one can be additionally colored, and also placed a bead in the middle. Petals are slightly bent up. The flower is collected so that the largest part is at the bottom, then the second largest and so on.
The end result should be something like thisThe second option is a simple paper rosette. Draw a spiral on a square piece of paper. Then the pattern is changed so that the spiral line is wavy, and the workpiece itself is irregular in shape with rounded edges. Scissors cut the paper along the spiral line.
 Rose flower preparation
The outer part of the spiral will be the center of the flower, so here you need to cut a small section of the “fringe” and tint it with yellow paint. The workpiece is slightly crushed by hand and twisted around the core, giving the bud the shape of a rose. At the end, the paper is glued. Additionally, a sepal can be cut out of green paper and glued onto paper tape.
 A simplified version of the finished rose
Watercolor paper roses
The most popular paper flowers for scrapbooking are roses. This is no coincidence, because the rose is considered the queen among flowers, and it always looks impressive, no matter what it is made of. For the next job you will need:
- Watercolor paper and pencil.
- A thin wooden stick (you can use a toothpick).
- Ink (gouache, watercolor or acrylic paints are also suitable).
- Sponge.
- Scissors and PVA glue.
For one rose, you need to cut out six paper blanks - 2 large and 4 smaller, with five petals. In the center of each, circle a circle-core of the same size. The decorating sequence will be as follows:
- We cut the petals to a circle in the center.
- We tint the edges of the petals with ink or paint, wetting a sponge with them. We are waiting for drying.
- We wind one of the edges of each petal onto a toothpick. We twist the opposite edge in the other direction, turning the workpiece over.
- Slightly bend the petals inward.
- Now the rose can be assembled by gluing the blanks together.
 Cut out petals of different sizes and prepare for coloring
 We color the petals with a sponge, giving them naturalness
 We twist all the petals with a wooden stick
 We glue already finished petals forming a bud
 We get such a wonderful rose
DIY paper gardenias
This flower, made from ordinary watercolor or whatman paper, looks very natural. Blanks with six petals are easiest to make with a hole punch, but you can also cut them out by hand. In addition, you will need food coloring, glue, cotton swabs, a container of water and gloves (optional). You can buy gardenia stamens or make your own.
- For one flower, we cut out two large blanks with 6 petals and one smaller one.
- We lower the parts into a container with water, they should get wet quite well.
- In parallel with this, we dilute food coloring in water.
- Wet parts are stacked and applied with a cotton swab paint. You can apply it to the central part or along the edges of the stack.
- We distribute the paint by squeezing the pile with our hands. Dried flowers will be paler.
- We fold the dried paper blanks with an “accordion” and carefully make folds on the petals, squeezing them with our fingers.
- Then they need to be straightened and completely dried.
- We collect flowers, connecting 2 large parts with 1 small one. We make holes for the stamens.
- We fold the blanks for the stamens in half in a pile, fasten with wire and glue.
 Ready hydrangea in blue
Advice!
If there are no factory stamens, you can make them from threads with glue and semolina.
To do this, we lower the segments of the threads into the glue, twist them together and dry them. Then we make small bunches of them. We again apply glue to the ends of the threads, then semolina and dry it. The stamens are ready!
Scrapbook paper flowers with a border punch
Do-it-yourself paper flowers for scrap products are very convenient to make using various hole punches - border, circular, curly. For the first option, you will need strips of scrap paper, decorations for the core, some ink or paint for tinting, cardboard mugs for the base and glue. In addition, you will need the border punch itself, scissors and, if possible, a crimper (embossing tool).
 Everything you need to make flowers
The sequence of work will be as follows:
- Cut out 2 strips of scrap paper (2.5x30 cm). One of the edges of each strip must be processed with a border hole punch.
- If there is a crimper, we apply embossing; if not, we leave everything as it is and continue to work.
- On a circle for the base (about 2-2.5 cm in diameter), apply glue and carefully fold the paper strip along the outer edge of the circle. Cut off excess paper with scissors.
- Optionally, we tint the edges of the “petals” with ink and an ink pad.
- After adding a little glue to the center, fold the second strip of paper on top of the first. We also cut off the excess.
- We glue the core - a button, a half-bead, a rhinestone, etc. The edges of the flower can be slightly raised.
To glue the finished flower, you can use glue or paper tape.
 We get such beautiful flowers
 Here is such a wonderful postcard you can make using this technique
Using a circular hole punch to make flowers
This option is also suitable for those who do not have special hole punchers. Round blanks can be cut with scissors using a template. To work, you will need double-sided scrapbook paper, decorations for the middle, glue, ink (optional) and a hole punch with a diameter of about 2.5 cm. Work sequence step by step:
- Cut out 6 paper circles.
- 5 circles need to be bent as follows: we divide each into 4 equal parts, drawing a horizontal and vertical line through the center. It turned out 4 points along the edge. From the top point, we lower straight lines to the right and left - these are the fold lines.
- We grease the petals with glue from below and glue them on the 6th circle close to each other. Before gluing, it is worth trying on the petals and adjusting the folds if necessary.
- Now you need to add a core to decorate the flower with sparkles to your taste.
 As a result, flowers like this are obtained
The use of a curly (flower) hole punch
Among the tools with which you can make scrapbooking decorations, there are special flower punches. The flat blanks obtained with their help are also used for the manufacture of three-dimensional flowers.
 Simple flower puncher
For such colors, double-sided cardboard is best suited, from which 6 blanks are cut out with a hole punch, preferably 3 different sizes. This can be done with your own hands according to the template. Next, you will need a wooden skewer, a spray bottle with water, glue, glitter or pearls for the core, ink for toning (optional). The algorithm of work is the following:
- Spray the flowers lightly with water.
- We twist the petals around a wooden skewer to give volume. For very thin petals, you can take a sewing needle.
- Lightly squeeze the petals with your fingers and leave to dry for 15-20 minutes.
- We collect a flower from six layers and glue the middle. For the assembly of small parts, paper tape is not recommended. We decorate the finished product with sparkles.
 After the flowers have dried and given a voluminous shape, we glue everything we did and that's what we get
Making a paper flower: scrapbooking technique
How to make fabric flowers
To decorate crafts using the scrapbooking technique, you can make fabric flowers with your own hands. It is not difficult to make such flowers, the main thing is to choose the most light, translucent materials that will not weigh down the composition. Nylon, thin chiffon and silk will do.
For a simple nylon rose, you will need a suitable fabric, a candle, scissors, small beads and a needle and thread. One rose is collected from four blanks for a bud with wavy edges, slightly different in diameter. In addition, you will need 2 leaves.
 Cut out mugs of different sizes from kapron
 Gently fold and burn the edges of the nylon to add volume to the petals
Then the blanks must be collected, starting with the largest and ending with the smallest. Fasten the rose with threads, sewing a few beads into the core. Glue the leaves underneath.
 We get such a voluminous rose
DIY chiffon flowers
The next master class is devoted to the manufacture of voluminous and delicate chiffon flowers. You will need pieces of chiffon 10x30 cm (5 pcs.), Felt mugs for the base, scissors, glue (gun), beads or rhinestones.
 Delicate chiffon flower
For one flower with a diameter of about 5 cm, you need to cut 5 circles of fabric, 5 cm in diameter. You can choose any size, depending on your preferences. The sequence of actions will be as follows:
- We slightly stretch the prepared circles so that the edges become shaggy and slightly wavy.
- We bend each blank in half, then we turn the edges to the middle, adding a drop of glue so that it does not shine through.
- We apply glue to the chiffon circle and carefully lay out the finished petals without pressing them. The structure should retain airiness and volume.
- Glue the decoration in the center of the flower.
Master class on creating flowers from chiffon
There are many ways to make paper flowers for scrapbooking crafts. Their choice depends on your taste and on what tools and materials are available. Fabric flowers will look no less original. Having shown imagination and a little patience, everyone will be able to choose for themselves the most suitable ways of making these jewelry.
 Such wonderful flowers can be worn as decorations.
MK for stamens var №1

What we need. Iris threads, nail polish, brush,
pva diluted with water (if it is thick, the threads will not be saturated with glue)
and small beads for decoration (you can buy the one for scrap
or any store that sells nail art).

No. 1 I pulled the threads on what was at hand ;-) a clothes dryer, I missed it well with PVA
№2 And now we wait until it dries
No. 3 You can also have this option, bend the wire, pull the threads, put it on paper and smear it. Then hang it somewhere to dry.
No. 4 Do not forget after you remove it from a sheet of paper, walk again with a brush without glue. And the excess glue will be removed and the rest will lie more evenly.

No. 1 So our sticks are ready.
#2 Now consider a few options. First, dip the tip into the pva glue, it turns out a drop (sorry for the quality, my phone didn’t want to focus, by no means)
№3 And immediately gently dip a drop in the beads from all sides.
No. 4 from and it's ready, now we put it in any container to dry.

No. 1 The second option will have to tinker. We dip the tip into varnish.
No. 2 So that the varnish does not drip along the entire length of the thread, I blow the drop itself for several seconds. This will have to be done several times. In my case, this turned out to be five dippings. I didn’t wait long between each layer (the varnish dried quite quickly), while I dipped the last thread, the first one was already quite dry. But with the other end of the thread, I already did all the "procedures" only the next day.
№3 Well, actually, our stamens.
No. 4 And this is a variant of their use.

MK Flowers for decoration.

All we need is
wire, pencil and nail polish.
First, for the sample, I applied all the varnish that I had on the film
and choose the one you like.

#1 The size of the petals will depend on the thickness of the pencil. We wrap the wire around the rod and make the first petal.
№2 We take out a pencil and make the next one. And so as many petals as you want.
No. 3 Petals can be left round, or you can stretch a little.
No. 4 Now we round off a lot by putting it on the rod.

No. 1 So our blanks are ready.
No. 2 For better grip, I walked along the contour with varnish.
No. 3 Now the most interesting, we fill the void with varnish. The more varnish on the brush, the more saturated the color will be. But don't worry if it doesn't work the first time and it will be very enlightening. After drying, you can safely apply another layer.
No. 4 Well, that's it.

My experiments with color.

MK for stamens var №2
I want to offer you another version of MK stamens from my childhood. I used to work with fabric flowers and at that time, we made stamens from semolina with dyed gouache.

No. 1 For this we need semolina, gouache, wire or prepared threads for stamens, floor tape or corrugated paper (which I used at that time).
№2 To begin with, we will paint the semolina itself. To do this, simply add gouache in small portions to a plate with semolina.
No. 3 And carefully grind with a spoon. After not long rubbing with a spoon, I did everything with my hands, I just rubbed it with my fingers (it’s more convenient for me)
No. 4 Well, our mixture is ready.

No. 1 Since I sometimes make soap, I have such a pigment, I added it for shine.
No. 2 As a result, I got golden pollen.
No. 3 You can, of course, dye with food or synthetic dyes.
No. 4 Here I also could not resist and added gold pigment to the red semolina.

No. 1 Now we wrap the wire with floor tape or ...
No. 2 Corrugated paper. One caveat, since the floor tape is sticky, it sticks very easily to the wire, but do not forget to moisten the corrugated tape with pva at the beginning
№3 And of course at the end too.
No. 4 Now that we need wire if we need stamens for flowers such as lilies. In other cases, you can simply use a thread for a stamen (you can see how it is done in MK No. 1).

No. 1 Now we do as in the first micron for stamens, just dip the tip in pva and then in our semolina. Let dry and you're done.
№2 I decided to make something like a lily in the morning. So do not judge strictly, it's so simple, I made it for an example of te-shaped stamens

MK Openwork napkins
These napkins and any diameter can be made by yourself

No. 1 For this we need corner hole punchers
No. 2 As far as I know, the lower part (corner limiter) is removed from any corner hole punch.
No. 3 Next, cut out a circle of any diameter from paper and proceed. For convenience, we hold the hole puncher upside down. This is so that when piercing the next pattern,
we could see where the previous one ends.
No. 4 Now it remains to carefully combine the drawings and do this in a circle. For example, I photographed a hole from the heart of the previous drawing.

Here are our napkins.
Of course, the more interesting the corner hole punch,
the more beautiful the napkin itself will turn out.

You can also try to make a corner and a strip. The principle is the same, remove the limiter and combine the pattern to do at the distance that you like best.
You can do it on one side or both, whatever you like.

This time I offer two ideas at once ...

No. 1 This idea is that it doesn’t have to be on the page, the whole photo is needed. Why don't we cut it into little pieces...
After choosing a photo, if it has one face, it will be better not to cut it. To do this, we measure from the front side, how many cm from the top of the photo, to the head, and also from the side of the photo, to the face.
No. 2 Now we put dots from the inside out and decide how many cm our square will be. I have a photo of 10x15 cm, and the squares themselves are 1.5x1.5 cm each. (Do not forget when you dot from the inside that the photo turns over and the left side becomes right, and the right side becomes left.)
№3 Now we begin to mark the next squares from the first. I had a few mm left along the edge of the photo, I cut them off immediately. Now let's number so as not to confuse the sequence ...
No. 4 and cut. Of course, you can leave it like that, just decide on the width between the squares

No. 1 but you can connect your imagination and arrange everything more interesting.
No. 2 Or even just remove some of the squares.

No. 1 Now for the next decoration ... For this we need a sheet of paper with any pattern (it doesn’t have to be stripes, it’s just that I had one at that time), a stapler and a tool for processing the edge of the paper (there is a special one for creating a torn edges, I use a regular thread ripper).
No. 2 Now we cut the paper into strips, my strip width is a little more than 1 cm. After we process the edges, you can then also shade them with some kind of color or leave them white.
No. 3 Here are our stripes and ready. Now each mode is still, I cut 2.5 cm
No. 4 After each small strip, fold in half and fix with a stapler.

And now we turn on the fantasy again and decide how we will apply them. You can take a photo in a circle, in a square, an oval ... You can also make just an empty circle, and in it either an inscription or decoration, or you can just leave it like that.
1) Ordinary circles are used, which can be easily cut out by yourself, an ordinary hole puncher flower (this is the first thing scrapers buy) or a star is used, and brads are fixed (any one can be used). Any variation of overlapping circles on top of each other and a worthy decoration is ready!
Instead of circles, we can use other shapes, such as a square, an oval, etc.
2) The inscription I ADORE YOU. I am not a supporter of English inscriptions, we still live in Russia and we want our favorite Russian letters for ourselves.
Yesterday I got a ready-made set, and of course there are cuttings in the form of such flags with inscriptions in English. Looking at this photo, the idea came to my mind that you can still use this flag, and stick your own strip of paper with a Russian inscription on top, thereby carefully covering these English letters that I hate.

This picture is just a storehouse of ideas. We look:
1) Again the same circles. Please note: there are just circles, and there are zigzag edges, i.e. we can also use curly scissors.
2) We use on circles - buttons, butterflies, things with inscriptions, birds, and most of all I like the line. It all depends on your imagination.
HIGHLIGHTS: I think the embellishments will be more "professional" if we use a thick cardstock, preferably from a thicker scrap paper than we take ordinary colored paper for the office. Agree, the result will be completely different.

Again, my favorite (now) circles, soon actual snowflakes, + corrugated paper circle - looks spectacular!

Also well thought out with the use of lace doilies, they can also be used as a stencil.

Trees are a wonderful decoration for children's albums, perhaps different variants, here it is at your discretion. On the left, a bright place on the tree is provided for notes.
Evgenia Smirnova
To send light into the depths of the human heart - this is the purpose of the artist
Content
Scrapbooking is the art of making and designing photo albums, photo and picture frames, booklets, postcards, gift wrapping. Scrapbooking for beginners will give everyone a chance to learn how to create original things with their own hands. The art of scrapbooking has several different directions and techniques - distressing (aging album pages), stamping (creating original effects using ink, stamps and applicators), embossing (creating convex paintings) and other styles used to design albums, paintings.
Scrapbooking - what is it and where to start
Scrapbooking for beginners is a kind of manual creativity, which is based on the design and production of photo albums, the original storage of family photos, personal stories in the form of photos, drawings, newspaper clippings, records. The original wedding and New Year's albums, a personal diary, an invitation card, a gift box, a picture, a book, a binding, an envelope for money will be very beautiful. Scrapbooking is also suitable for beginners, it is worth choosing simple options, having mastered which it will be possible to move on to complex schemes.

At its core, scrapbooking acts as a way of storing stories, using tactile and visual techniques that replace the story. The photo album should be decorated in a special way and consist of separate leaves, each of which will express a complete thought (collage). Such original albums should cover one topic - the birth of a child, a wedding. For beginners, there are ready-made schemes (sketches).

On the territory of Russia, demobilization albums are widely popular, in which there are not only photographs, but also drawings, collages, interesting cartoons, wishes, addresses of colleagues. The production of such original albums is carried out by soldiers who are novice masters, and everything you need can be collected throughout the service.
It simply does not make sense to arrange all the photos in the house in the style of scrapbooking, so a specific topic must be chosen, after which photos will be selected for it. Beginning scrapbooking masters can get tired of creating a masterpiece for a long time, but after making a few elements, there will be a desire to continue doing this art.

What do you need for scrapbooking
Scrapbooking for beginners requires patience, preparation of materials. You will immediately want to buy a lot of things for work, but you should not buy too expensive tools. For novice scrapbooking masters, you need to pick up a starter kit of tools that do not have a very high cost, and every beginner can purchase them. It is not necessary to buy professional tools used by experienced scrapbookers.

materials
If it was decided to engage in this type of art, beginner scrapbooking needleworkers will need the following materials:
- scissors (several types);
- Double-sided tape;
- glue;
- paper and pencil;
- sewing machine;
- figured hole punch;
- buttons, ribbons, rhinestones;
- cardboard or cutting mat;
- rubber stamps;
- ruler and scissors.
Tools
Scrapbooking beginners should have the following tools:
- It is necessary to take several types of scissors (small and large).
- Double-sided bulk adhesive tape, special adhesive tape for photos.
- Plain PVA is ideal for gluing paper.
- You will need special curly hole punches, but there is no need to buy more than 2 pieces for novice scrapbooking masters.

- For a beautiful and original decoration of a notebook, photo frames, ribbons of various thicknesses, rhinestones, buttons or other decorative materials that are at hand can be used.
- For cutting details, simple cardboard or thick old magazines are suitable.
- Scrapbooking for beginners does not require too many tools, so it is not necessary to purchase a sewing machine, it is not always needed. Instead, take a simple thick needle or a thin awl.
- All you need is a few rubber stamps, which come with ink pads. Wet wipes can be used to clean the dies, but only those that do not contain alcohol, beginner scrapbookers can wash them with warm soapy water.
- Experienced scrapbooking masters use the eyelet installer, and beginners can buy kits for installing them in specialized sewing stores.
- A ruler with scissors will be replaced by a special cutter (a simple metal ruler, a clerical knife).
sketches
Scrapbooking sketches for beginners will help greatly facilitate postcards, notepads. For beginners, sketches will become a real lifesaver, because they can give new ideas, inspiration while creating an original photo album, frame, notebook. If it doesn’t work out to make a scrap page on your own, you should pay attention to ready-made templates(blanks) for scrapbooking.


Master class on scrapbooking a photo album for a child
A step-by-step scrapbooking master class for beginners will help you easily make a beautiful original scrapbook for a child. Possessing creative and innovative thinking, you can easily create a real work of art, but in the absence of imagination, there is a way out - to get acquainted with the master classes and choose a more suitable option for beginners.

In this case, you will need the following materials:
- 3-5 sheets of paper with any pattern;
- 4 sheets of cardboard (white), 12.5x12.5 cm in size;
- 2 sheets of thick cardboard measuring 13x13 cm (special paper for scrapbooking).

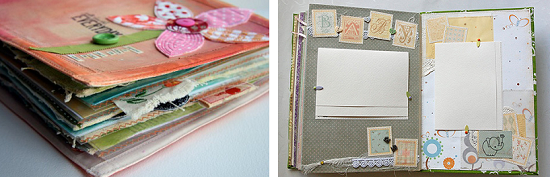
Step by step instructions for scrapbooking a photo album for beginners.
- First, the cover of the original album is made. 2 squares are cut out of paper, the dimensions of which are 15x15 cm. 6 square sheets (12.5x12.5 cm) will be used as the inner sheets of the album.
- Paper is glued to cardboard squares, all protruding corners are cut off. The left and right corners are cut straight, and the bottom and top corners are cut at an angle.

- Paste carefully.
- Next, a thin tape is taken (about 50 cm long), glued to the inside of the square. The end of the tape "A" (as indicated in the photo), should be slightly longer.
- 2 pieces of tape are glued to the square (the length of the tape is 5 cm, in the lower and upper parts of the square).

- Following the example shown in the photo below, all parts of the future album are connected.
- From above, directly on the tape, white sheets of paper are glued, and for the cover it will be necessary to take colored paper (various colors - black, red, blue, pink).

- All pages of the album are pasted over with squares of paper; any other decorations can be used according to your own taste.

How to make DIY scrapbooking frames
To make an original photo frame with your own hands, beginner scrapbooking masters will need the following materials:
- scrap paper (1 sheet);
- pencil;
- ruler;
- scissors;
- non-writing pen or wand;
- a photo;
- stationery knife;
- glue;
- scotch.

A step-by-step plan will help you not to make mistakes and do all the work correctly, and a stencil will help you make a beautiful inscription, which will be simply indispensable in the initial stages. To create an original and unusual photo frame, you should use a variety of stencils to help make various drawings, which will be relevant for people who cannot draw beautifully. Video scrapbooking lessons for beginners will become an indispensable tool in creating a real masterpiece.
- At the initial stage, a sheet of cardboard is divided according to the scheme shown in the photo.
- Using a utility knife, carefully cut out the middle. A cardboard frame is glued to the back of the scrap paper.
- Inside the frame, the paper is carefully cut crosswise and with the help of a non-writing pen, the sides of the bends are made.

- The corners are cut off, about 5 cm recede from the edge of the cardboard. The upper and lower parts of the future frame are determined. Not very large cuts are made at the top, which should be a little larger than the photograph. Adhesive tape is glued along the perimeter of the frame, with the exception of the upper part.
- Cardboard is glued on the back so that the photo does not fall out. The corners of the frame are bent from all sides, it is necessary to cut out everything superfluous.
- A footboard is made from the remaining cardboard, attached to the frame.

- Almost any decoration can be used to decorate a photo frame - a flower, letters, beads, rhinestones, any material at hand. A digital camera will help you take beautiful photos for a whole exhibition hall of original photo frames.
Notebook scrapbooking technique
To make a beautiful notebook with your own hands, a beginner needleworker will need the following materials:
- Super glue;
- thin felt;
- scissors;
- double-sided tape (sticky film);
- notebook and paint;
- decorative elements for decoration.

- A thin felt is laid out on the table, after which a notebook is laid out in the center, about 10 cm is left to fold the material along the perimeter, all excess is cut off (it is necessary to cut out the shape of the notebook).
- A double-sided adhesive tape is glued to the inside of the cover, the notebook is folded together with the felt, all lines are carefully smoothed out by hand (the binding must be evenly covered with material). Corners need to be cut.
- All edges of the felt cover are glued, each bend is pressed well so that the glue has time to grab. The notebook is closed, pressed down on top by any hard object.
- At the very end, the notebook cover is decorated - a pre-prepared blank or template is used, colored paint (colors can be very diverse - black, scarlet, gold, green, yellow, blue). The most important thing is that the paint is completely dry.
Video tutorials for scrapbooking postcards
Things that were made with their own hands, and this is scrapbooking for beginners, are in a real trend and are gaining more and more popularity every day. It is possible to buy ready-made exclusive items or be patient to create a work of art. Having made just one
Discuss
Scrapbooking Ideas for Beginners
The idea of book design for postcards and photos appealed to many lovers of handmade. Modern materials and means allow you to create real masterpieces. You yourself can get to know this technique better, learn how to make scrapbooking with your own hands or special paper for this type of creativity.
In such a place it will be nice to keep memories of the most precious moments of life.
A fashionable direction in needlework allows you to design and create family and personal photo albums in various styles.
- European - a minimum of decor, the main attention is focused on the photo and its shape.
- American - the composition consists of many elements and decorations, represents a single whole.
- Clean and simple - original solutions for free space, simplicity and accuracy.
- Shabby chic - lace, bows and ribbons are combined with elements of drapery and scuffs.
- Vintage - the atmosphere of antiquity and the spirit of Victorian England.

In this technique, you can perform various crafts for the home.
His common techniques are:
- cropping - photos are cropped so that only the most important details remain;
- stamping - various applicators and stamps with drawings are used;
- decoupage - special pictures are transferred to paper and other surfaces;
- journaling - small inscriptions and tags with its description are placed under the photo;
- distressing - a method of aging paper with ink is used.
They can use almost any material - from colored paper to thick fabrics and dried flowers. It all depends on your imagination and the given topic.
Necessary materials

List of tools and materials that will be needed for work
Beginners often ask themselves the question - how to make scrapbooking with their own hands and where should they start? For them, there are special sets of already assembled scrap paper. For non-you will need special tools:
- different types of scissors for cutting;
- punches and stamps;
- sharp clerical knife;
- glue, ruler and tape;
- cutting mat;
- decorative accessories.
How to make DIY scrapbooking paper
You can not buy a whole set, but make all the blanks yourself. To do this, follow the instructions on how to make DIY scrapbooking paper.
You will need - colored or white cardboard, napkins with decoupage patterns, sharp scissors, a spray bottle with water, an iron and ironing board, food thermal film.
- Separate the bottom layers from the napkin and iron the top one so that there are no folds or wrinkles.
- Lay the cardboard and evenly spread the thermal film on it.
- Place the prepared part of the napkin on top, aligning it with the edges of the cardboard so that a few millimeters of the film protrude beyond the edge.
- Cover the workpiece with a clean sheet of paper or the lower layers of a napkin and iron it with a hot iron.
- Turn the hot paper over so as not to dislodge the film and trim off any excess around the perimeter.
- Iron again - if wrinkles form, moisten them with water and repeat the procedure until they disappear.
So you can make scrap paper of any size, color and thickness, with any pattern you like, significantly saving on a store set.
DIY scrapbooking album - step by step
Creating albums is a more responsible and complex task, and at the same time incredibly exciting and interesting. If you don’t have your own ideas, you can get them from master classes on making a scrapbooking album with your own hands on the Internet.
Start with simple and small compositions that do not require a lot of decor, so you can practice gluing and decorating sheets so that further complex work turns out to be more accurate.
The choice of color and decor is a matter of taste for everyone
How to make a scrapbooking photo album with your own hands step by step:
- Take a sheet of thick white paper and divide it into 12 identical squares with a pencil and a ruler in three rows of four squares.
- Cut the sheet, separating the sectors from each other. Do not cut to the end one square on each side.
- Glue certain sections together to make a whole ribbon, fold it like an accordion.
- Assemble the album using washi tape or medium-thick paper, gluing the pages together so they don't fall apart.
- Make a book spine - glue a strip of tape of the desired size to its first and last page.
- Start finishing your album. Think in advance about its theme and the photos you will put in it, create some preliminary sketches.
- You can use any means at hand - stamps and curly scissors, small sewing accessories, pieces of thread and fabric, buttons and rhinestones. But remember that the smaller the album, the less voluminous details, otherwise it will appearance will be far from ideal.
- Tie the finished item with a beautiful ribbon or sew it with an unusual thread. Optionally - write your name or its name on the cover in ink or paint.
DIY postcards using scrapbooking technique
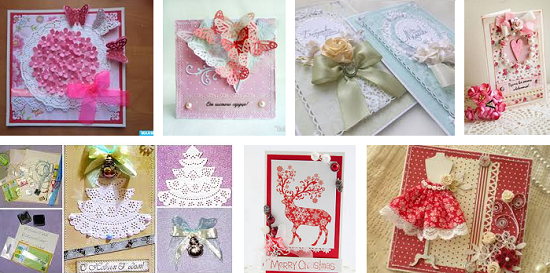
Postcards look especially touching in this style for any occasion in life.
All you need to create an individual postcard is whatman paper, colored paper, scissors, glue and a little imagination. Depending on who it is intended for, its content and form may differ.
How to make a DIY scrapbooking card?
- Prepare the necessary items - colored paper, cardboard, scissors, glue, lace, ribbons, beads, artificial flowers.
- Make the base of the postcard out of heavy paper, preferably soft double-sided card stock. It can be colored, smooth or embossed.
- If you have a dark base, cut off a piece of light paper and place it in the wish area. Use ready-made templates for cutting even shapes.
- Do not be afraid to experiment, materials with different textures. They will give your product originality.
- For beginners, there is an easier way to create your own masterpiece. In the stationery departments, ready-made thematic sets for creating postcards are sold. They include all necessary elements for creativity.
DIY scrapbooking notebook - step by step instructions
Small size scrapbooks are neat and easy to use, can be a good gift for a loved one.
You can make a scrapbooking notebook with your own hands using this master class.
- Make a blank from A4 sheets to make an A5 size notebook. Fold each sheet in half and stack them in a stack of three sheets.
- Sew the structure with a thick thread, fill the seam line with glue from the fold side so that the threads lock in place and you get a neat spine.
- Fix the workpiece with clerical clips and let it dry. Re-glue the joint with glue and press the satin ribbon against it so that its edges protrude on both sides - one short, the second long.
- Burn the edges of the ribbon with a lighter to keep them from fraying. Bend the short end inward and glue it again.
- Make a binder. Cut out three cardboard shapes. corresponding to the size of the spine, front and back of the workpiece with a margin of 0.5 cm.
- Move on to cover design. Place the binding pieces on the material that your notebook will be covered with - scrap paper, textiles or leather. Cut off the top corners of the cardboard.
- Cover the binding by folding the outer edges of the material inward. Fix them with glue. Mask the attachment points with a flyleaf - fold two sheets of thin office paper in half and glue them to the cover on both sides, first to the block, and then to the top.
- Connect the pages with the prepared block - glue the sewn folds to the spine, and then proceed to the decor.
- Design the notebook at your discretion - cut out various shapes from leather or colored paper, tint the pages, use lace, beads and buttons.
How to make a DIY scrapbooking wedding album
All young couples want pictures from the most memorable day of their lives to last forever. The original way for their storage offers a master class of a handmade wedding scrapbooking album.
- Make an album, choosing the size of the sheets according to the size of the available photos.
- Place one picture on each sheet and deal with its design.
- Connect sheets of watercolor paper in pairs with glue, decorate them with gold patterns or use a stencil.
- For greater effect - run along the edges of the pages with a dry brush with gilding.
- Make separate substrates for your photos - apply pattern fragments on them with the same stencils, make cuts in their corners to fix the pictures.
- Take care of substrates for photo cards - stick lace, sequins or satin ribbon around their perimeter. Make sure that the pictures are not lost against the background of the design you have chosen.
- Cut out the cover from thick cardboard so that it is slightly larger than the size of the pages themselves. Paste it with velvet by analogy with the technique that is given in the manufacture of a notebook. Decorate the top of the cover with an applique of pearls or beads, small lace. For greater density - put a synthetic winterizer under it.
- For the convenience of viewing the wedding album - insert the rings into it. Make identical holes in the sheets and cover with a hole punch and fix the fasteners of the rings in them.
DIY scrapbooking flowers

The most delicate decor - various flowers
A variety of jewelry and small decorative elements allows you to create real miracles of handmade. But many needlewomen try to make various flowers and figures on their own. For those who are not afraid of difficulties - a master class on how to make flowers for scrapbooking with your own hands.
- You need - two hole punchers for 6 petals of different sizes, watercolor paper and drawing paper, food coloring, plastic stamens, cotton swabs, water and glue.
- Make flower blanks using hole punchers - two large parts and one small one per flower. Cut the pieces and place them in a container of water.
- Dilute the dye in the proportion that is necessary to obtain the desired shade. The brighter the color, the more paint and less water, and vice versa.
- Make sure that the paper elements are well saturated with moisture. Take them out of the water, put them in piles of 6 large and 3 small figures, apply diluted paint with a cotton swab.
- Drip a couple of drops into the middle of the flower, and then spread it around the edges. Press the stack of blanks on top so that the dye penetrates all the elements and set them aside to dry. To speed up the process, use a hair dryer.
- Collect the dried petals with accordions - put the extreme petals in the middle, and the ones following them under the middle.
- Glue the parts together, slightly shifting them relative to each other, place the smallest parts on top.
- Make holes for the stamens in the center of the resulting blanks. Thread them with a thin wire and fix them at the base with glue.
Scrapbooking valentines
Valentine's Day is a good occasion to please your loved one with a homemade postcard. Make your own scrapbooking valentines. To do this, follow the above technique.

One of my favorite holidays is Valentine's Day.
A couple of tips for those who don’t know how to make a scrapbooking card for February 14 with their own hands:
- make a valentine in red and pink saturated colors;
- use the symbol of the holiday heart as a form for blanks or decor;
- write a frank or romantic, memorable wish;
- think over the design and prepare the necessary materials;
- do not use expensive accessories if you are making a postcard for the first time;
- try to do the work neat and harmonious;
- Do not copy other people's ideas, bring something of your own.
Pedigree scrapbooking book
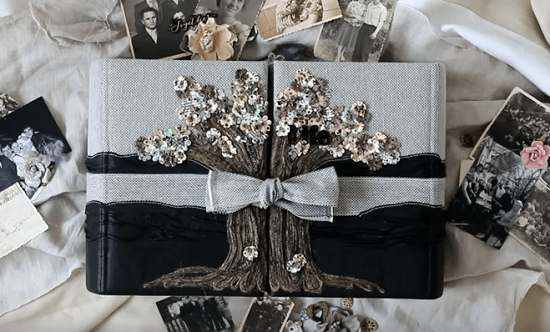
Design option for a family album in the form of a tree
The principle of operation is similar to a notebook or a wedding album. The scrapbooking family tree book made by their own hands differs from them only in some nuances.
- It must contain a family tree. It can be drawn by hand or executed in the form of an application.
- Under the photographs of family members, it is worth indicating the names and dates of the captured events, put a brief description.
- The design of the book is best done in shabby chic or vintage styles, applying journaling and distressing techniques to it.
- It is worth taking care of the volume of the album in advance - there should be enough space in it for photos of new relatives.